Everyone likes an inviting, silky-smooth surface, and power tools devoted to making that happen are now much better and more varied than ever.
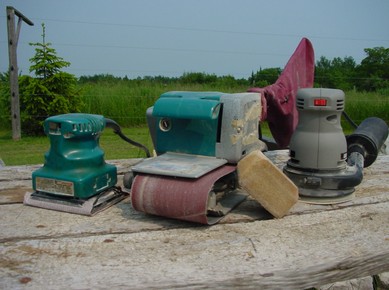
If you’ve got a house to fix up then there are three types of sanders you might consider:
1) The Random Orbital Sander
- By far the most versatile is the random orbit machine.
- It removes material at a good clip, yet also prepares very smooth surfaces using the correct abrasive and a light hand. While this seems like a contradiction, the secret behind versatile performance is the two-part movement of the disc itself.
- While the circular sanding pad is rotating around a central axis, the whole disc is also orbiting randomly at the same time. It’s sort of like the way the earth spins while also orbiting around the sun.
- The two motions come together on a wood surface to produce a sanding pattern that leaves remarkably smooth results, regardless of the fact that the abrasive moves both along, across and diagonally on the wood grain.
- I chose to buy a variable speed random orbit sander about a decade ago, and I can recommend this version of the tool.
- The option of turning down the speed is useful when preparing outdoor wood surfaces before renewing an existing finish.
2) The Belt Sander
- If your home improvement plans include furniture-building, then consider a hand-held belt sander.
- This tool is ideal for heavy-duty smoothing and leveling of solid wood and veneered sheet goods.
- It’s also vital for preparing edge-glued solid panels after they come out of the clamps.
- In situations where you need to remove lots of wood quickly, the belt sander is your best bet.
- You want a medium-size unit with a dust bag (though all brands still kick some dust into the air), sporting a belt in the 3” x 21” or 3” x 24” size.
- Belt sanders can’t do everything, but they will do the important, power-intensive jobs well.
- I’d steer clear of 4” x 24” machines, unless you’ve got a good reason for the extra size, cost and weight.
- I keep 80, 120 and 150-grit sanding belts in my shop; anything coarser is unnecessary, and anything finer I prefer to tackle by hand or with a random orbit sander.
- A rubber crepe block cleans dust and resin from all sanding belts and multiplies their life many times. Just hold the block against a dirty, spinning belt and watch the sawdust and resin fly off.
3) Sander for an Ultra-Smooth Finish
- It’s impossible to properly finish wood without sanding lightly between coats to level and smooth the newly-sealed surface. Even if you start out with what feels like smooth wood, it won’t stay that way after the first coats of urethane, varnish or shellac dry. The wood fibers that were laid flat during the sanding process pop up as they absorb finishing liquid, then harden in the popped-up position.
- Sanding between coats with a 220 or 240-grit abrasive is the best way to get the surface smooth again before another coat goes on.
- Although it’s quite possible to complete between-coat sanding by hand, a non-orbital, palm-style 1/4-sheet finishing sander makes the job go much faster, especially when you’ve got to cover a lot of ground on big furniture or wood floors.
- Considering the other kinds of sanders on the market, there’s no need to use a finishing sander for anything else.
- In the time period before you get one, finish-sanding by hand is quite practical for small jobs.
 4) Guaranteed Glass-Like Finish
Want to get an exquisite, glass-like finish on flat surfaces?
- Start by applying four coats of urethane (sanding between coats).
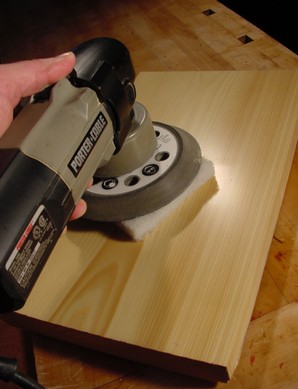
- Then grab your random orbit sander. Place its disc on top of a Scotch-Brite pad resting on the wood surface, then switch the sander on at medium speed.
- As the machine vibrates and rotates, the rubbing pad creates a buffed, glossy surface on the wood in no time.
- Different grades of pads yield different sheen levels, though all leave behind a beaming smile.