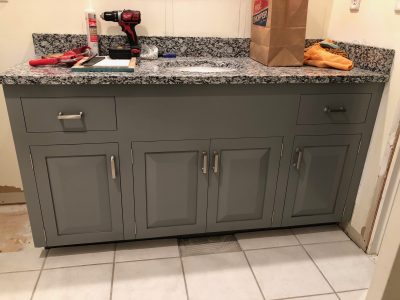
PUBLISHED 1Dec2018: I always find it exciting to see people build great things for their home and family, especially when they’ve never done it before. Chaz C. is a man who did just that. He lives in Kansas City, and in early 2018 Chaz decided to get serious about building cabinets for his home. He has succeeded, too.
“I’d never done anything like this kind of woodworking before”, Chaz explained to me when he got started, “but I’ve always wanted to. I figured if I was careful I could do a decent job and save a bundle of money. That was why I signed up for your course. My plan was to start with a bathroom vanity, then build more cabinets after that.”

Chaz is one of more than a hundred people who’ve taken my online cabinetmaking course during the past year. It’s called BUILD YOUR OWN TRADITIONAL FACE FRAME CABINETS and he did a fabulous job on that first project of his following the methods I teach. The photos you see here are all of his bathroom vanity.
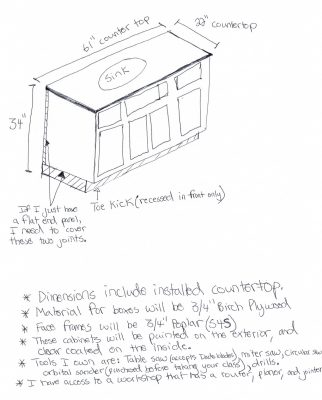
I got to know Chaz fairly well as I helped him through his project with one-on-one advice by email in addition to the plans, illustrations, videos and instructions that make up the course. He was one of the more active students I’ve had, with about 60 emails asking questions and seeking clarification during the building process. Chaz is a careful man, and his diligence paid off. You can see the design he came up with here in one of his preliminary sketches.
Chaz used the kind of 3/4”-thick birch veneered plywood I recommend for main cabinet bodies, and I helped him decide how to arrange the drawer openings and face frames to accommodate the sink and shelves as he drew up his design. To make things a little easier, Chaz opted to paint his cabinet, so he saved money using poplar for all the solid wood parts. Poplar’s an economical option that’s hard enough to resist damage and is tight-grained so it takes paint well.
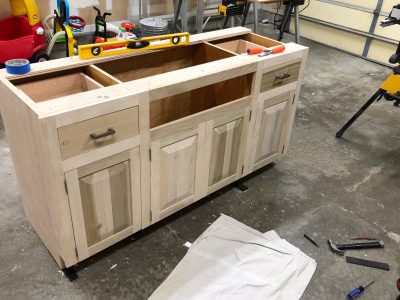
 Chaz didn’t have many tools when we started out, nor did he have a workshop. He built the cabinet in his garage and bought himself a small portable tablesaw and a belt sander following my recommendations for specific models. “I don’t have a router, jointer, or planer”, explained Chaz, “so I’m trying to determine what I really need and what methods I’m going to use. I don’t know if I’ll be able to make doors myself, at least not the first go around.”
As it turned out, Chaz did make his own raised panel doors from scratch using simple joinery and the bare minimum of tools I recommended. The angled bevels you see are made using a sharp hand plane – no fancy router table nor router bits needed. “I loved that I could do this without any special jigs or blades”, remembers Chaz.
He did end up buying a few tools, including a belt sander based on my recommendations. My top pick for him was a Makita. I bought this same model back in the late 1980s and it’s still working great for me. I also own and recommend a Porter-Cable model. Though not quite as nice to use as the Makita, it’s quite good and at a lower price. Both these machines are made to use 3” x 21” belts, which is a common size. The Makita actually handles 3” x 24” belts quite nicely, too.
“I’m pretty proud of how the cabinet turned out,” says Chaz. There are a few mistakes, but all-in-all I’m really pleased for my first one. The drawer slides were by far my greatest challenge. My next project will be cabinetry for the master bathroom, which will be a little more challenging from a design perspective. The space has two walls that come together to form a V, so I will need to make an angled unit to fit in the middle of the V.”
 Chaz is exactly the kind of person I make my online courses for, and perhaps you are, too. BUILD YOUR OWN TRADITIONAL FACE FRAME CABINETS comes with 42 videos, detailed plans and instructions, plus you get unlimited one-on-one access to me for advice for 30 days after the course sessions start. Money-back guarantee, too.