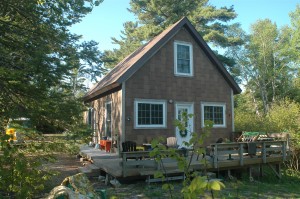
 It was a bad day when fire destroyed the 60-year-old heirloom cottage of Mike and Alice Ogden, a bad day indeed. But from the ashes of this disaster grew roses of success. On the same today you’ll find a compact, classically shaped structure that’s as energy efficient as it is eye catching. And how the Ogdens got from smoldering ruins to where they are today offers four pivotal strategies that can help anyone interested in building elegantly and efficiently with minimal environmental impact.
Strategy#1: Make Space Count
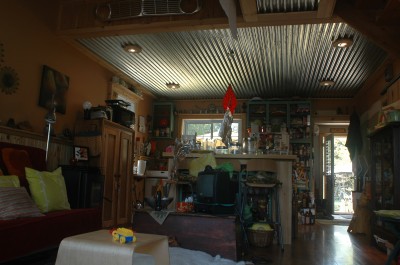 Insurance company policy required Mike and Alice to rebuild on the same footprint as their old, 20 x 26-foot, 1940s structure – nothing larger was allowed. But this small size didn’t stop them from outfitting their new place for comfortable, year-round living. They may not have been able to go longer or wider with their floor plan, but that didn’t stop them from going upwards, following a design philosophy that allows every cubic inch of internal building space to become useful. In the end, they got nearly twice as much usable floor area, without taking up any additional ground.
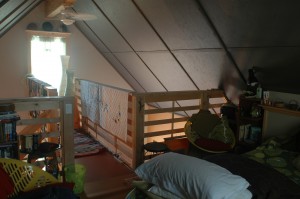
The key to making better use of the space involved increasing roof pitch to 45º, from the previous 20º slope on the old place. This allowed the creation of a second-floor sleeping loft over the kitchen below, with a staircase going up into an open, cathedral-ceiling area above the downstairs sitting and eating area.
“People often comment on the good feeling they get inside our new place,” explains Alice. “A big part of this comes from the sense of airiness you experience sitting on the couch and looking up at the loft railing. Despite the small size, you never feel cramped.”
Cathedral ceilings like this are attractive, but they’re also technically troublesome. At least if you want to build them right, that is. In order to remain free from internal condensation and mold, every cathedral ceiling structure must be ventilated, both at the top and bottom. It’s certainly not enough to stuff fiberglass into the space between rafters (as is commonly done), then seal it all behind polyethylene vapor barrier and hope for the best. You either need to build in eaves-to-peak vent spaces into a wood-framed roof, or, like the Ogdens, build using a structural system that’s completely sealed and requires no internal ventilation at all.
Strategy#2: Energy Efficiency By Design
 After looking at all the options for building their project, Mike and Alice opted for structural insulated panels (SIPs) for the entire project, in part because of the slick option it offered for the open roof structure they had in mind.
“We’ve always thought of moving up to the cottage full time some day,” explains Mike, “ but there was no way the old place could ever have been heated properly during cold weather. That’s why we put a lot of emphasis on building a tight, warm and efficient structure.”
SIPs are factory-made sandwiches of wooden sheet goods glued to an internal layer of foam. Oriented strand board (OSB) is typically used for above-ground SIPs, while pressure-treated plywood is glued to foam to make SIPs that are suitable for below-ground foundation walls. Although most commonly used for walls, SIPs also make terrific roof structures, especially on narrow building designs, like this one.
The Ogden project is 20-feet wide, allowing 16-foot-long, 8 1/4”-thick panels to be used as structural roof members, with no need for rafters or trusses underneath. These panels are entirely self-supporting. All that was required was a 5 1/2” x 16” glulam ridge beam running down the centre of the structure, from gable to gable to support the top end of each panel. Built like a big house-of-cards, the roof panels were hoisted up using a boom truck, then anchored in place with 10”-long, large-head wood screws. There’s absolutely no space lost as is common with conventional attics. Everything underneath the roof is heatable and suitable for finishing. Beads of expanding polyurethane foam applied wherever the panels rest on walls and gable ends seal out air, flies, rodents, bats and creepy-crawlies that routinely find their way into conventional cottage structures. Accomplishing the same thing with a ventilated, stick-framed roof is nearly impossible.
Strategy#3: Mudroom Transition Zone
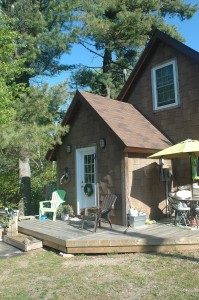 With no basement space to accommodate mechanicals, the Ogdens opted for a working mudroom at the back of their place. It provides day-to-day entry, while also providing space for the 200-amp electrical panel, washer, dryer and water heater. In order to echo the appearance of the main roof, the mudroom roof, though smaller, is also sloped at 45°. And since it, too, is created entirely with SIPs panels, there’s lots of room up above for a mini loft that’s used for seasonal storage.
“Even though it’s small,” explains Alice, “ the mudroom gives us space for things that couldn’t conveniently fit into any other part of the cabin. It’s also a place for shoes, coats and hats. Its got its own insulated exterior door, too, before you step into the kitchen, making it easy to keep washer and dryer noise out of the rest of the cabin.”
Strategy#4: Low-Impact Plumbing
Although a septic system was technically possible on the Ogden’s site, it would have meant cutting down a large patch of mature pine and poplar trees to create a weeping bed. Since Mike and Alice weren’t prepared to pay such a high aesthetic price for a flush toilet, they saved time, money, disruption and trees by installing a composting toilet.
“Our Mulltoa unit has performed perfectly”, offers Mike, “even with guests.” Water from sinks and the shower go into a grey water pit, leaving our site looking the same as it always has, with no concerns about harming water quality in the lake.”
If you’ve been watching cottage country for a while, you know that parts of it are in serious decline as they become more and more like suburbia. Large buildings and lavish expectations are sapping the life from what was once a landscape of tranquility and refreshment. Modest, affordable, carefully designed cottages like the Ogden’s show another way, and proves that small can, indeed, be very beautiful.
Tech Tip: Warm Floors Without a Warm Basement
Lakeside homes and cottages rarely sit on top of heated basements, and this means that cold floors and feet are a common problem during fall, winter and spring. Common but unnecessary, regardless of whether you’re building new or renovating. The Ogden home includes an insulated subfloor sandwich that is, according to Alice, “ the warmest floor I’ve ever walked on.”
The joists sit 12” to 24” above the undulating bedrock and shallow soil of the site, creating an open crawl space underneath the structure. And while this is usually a recipe for a very cold floor, one simple detail changed everything.
Conventional 5/8”-thick plywood screwed on top of these joists, with 2” of extruded polystyrene foam laid on top above that. Everything’s then covered by a layer of 1/2”-thick plywood, all held down with 4-inch deck screws that go through everything.
“You could put just about any kind of floor on top of this insulated design,” explains Mike. “We opted for a medium brown laminate, over top of electric, radiant infloor heating mats for supplemental heat when we’re not using our pellet stove.”
Tech Tip: Hoisting Panels
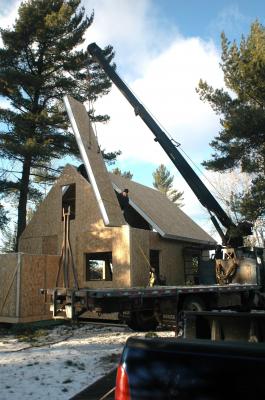 Lifting SIPs panels onto a roof with a boom truck is easy with two custom-made lifting lugs. Bore 1” diameter holes one-third and two-thirds along the length of a panel, bolt these lugs into the holes, then hook chains onto the lugs and lift. When the panel is set in place and secured with screws, remove the lugs and fill the holes with expanding polyurethane foam.
Tech Tip: Cool Details
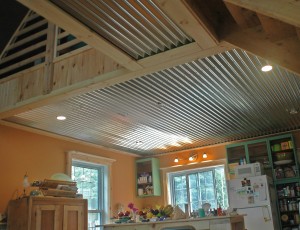 Interested in moving beyond the ordinary when fitting out your cottage? You won’t find these design details in ready-made home plans, yet they add lots of value at minimal cost.
Corrugated steel kitchen ceiling: Instead of drywall above the kitchen work space, the Ogden’s God-daughter, Tanyan, suggested unpainted, galvanized roofing steel framed by 1x4s along the edges. Recessed halogen fixtures fit into holes cut in the steel with a jigsaw. It’s functional and reflects the kitchen lights nicely in the evening.
Window frame “shelves”: 4-inch-wide caps on top of each window frame allow for plenty of knick-knack storage in this 750 sq.ft. home.
Overhead catwalk: A 24”-wide walkway above the living room leads from the sleeping loft to a double-hung window overlooking the lake. Although small, this extra floor space ads a unique feature without spoiling the overhead airiness created by the open cathedral ceiling
Wrap-around rim deck: Although small in size (only 48” wide along most of its length), the eastern white cedar deck adds a lot of useful space for plants, dog bowls and deck chairs.