Milk paint is easy to like. It’s safe, fast drying and when used in a particular way it delivers a kind of beauty that only gets better with the bumps and dings imparted by everyday life. It’s this classic, old-time beauty that really makes milk paint worthwhile.
I first experienced authentic milk paint in 1988, working as a cabinetmaker in a shop where we built traditional kitchen cabinets. What struck me at the time was not just the look of antiquity created by milk paint, but also what you could do to make this finish look old and wise by distressing it. I’ve been hooked ever since.
As you’d guess from the name, milk paint is based on milk proteins, enhanced with natural pigments, lime and clay. It comes as a powder that you mix with water, then brush on. Milk paint can be applied to clean, bare wood, though you can also brush it on over an existing urethane finish if you use a bonding agent mixed with the paint. I’ve applied milk paint to furniture that had been lightly oiled in the past and it worked fine too.
One way to use milk paint begins by staining your wood to simulate that antique, golden patina imparted by age. Any medium brown stain will do. Let this stain dry for a couple of days, then mix up a batch of milk paint with water. You need to know right up front that thorough mixing takes some effort. I’ve tried mixing by hand with a stick, but it leaves lumps. The instructions recommend a blender, but I’ve had good luck using a large spade bit in a cordless drill as a kind of workshop egg beater. The best part of using a spade bit is that I don’t have to sneak the blender out of the house past Mary’s vigilant eye.
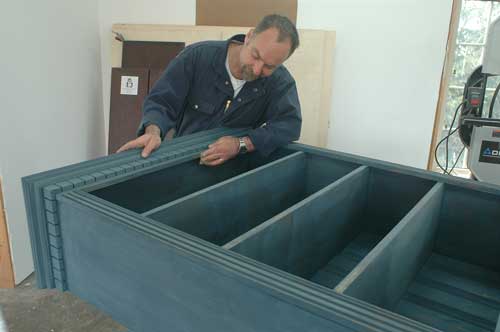
Brush on the paint and let it dry on top of the stained wood. I applied one coat of Liberty Blue to the bookcase you see here; two coats may be necessary in other cases. As with any finish, milk paint makes the wood a bit rougher as surface fibers swell, stand upright and harden that way. Let the milk paint dry for a full day, then grab a piece of 220-grit sandpaper and lightly rub the surface to knock down the raised grain. As you work, it’s time to apply some artistry, too.
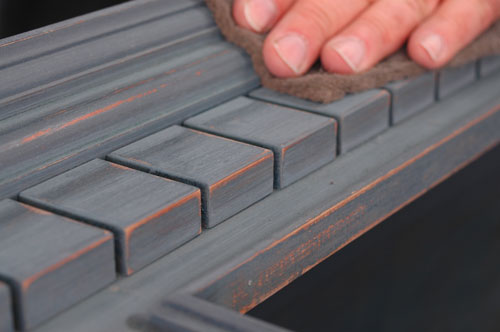
If you’re looking to create a distressed finish, sand slightly more vigorously on areas that you’d expect to be worn by age, working right through the milk paint, though not through the stain you applied initially. Go easy at first. Take just a little paint off here and there, then stand back and look at the whole piece of furniture. Add more wear marks until the whole project sports the degree of antiquity that suits your taste. I find a fine 3M rubbing pad works best for a final rub down. You can attempt distressing any kind of paint, but most resist the abrasion too well for best results. Milk paint sands willingly, and that’s why I like it best for distressing.
When you’re satisfied with the look, vacuum off all milk paint dust, then seal the wood surface. I’ve used both water-based and oil-based urethanes for this job in the past, but there are better options. One of my favorites is Minwax Wipe-On Poly. Apply one coat with a rag (a brush is a big help getting the product into corners). It dries in one day. A final rub down with the 3M pad creates a silky smooth surface.
I’ve never seen authentic milk paint stocked on the shelves of ordinary home improvement stores, but that doesn’t mean it’s hard to get. I buy mine from a place called Homestead House Paint Company (877-886-5098). They manufacture the stuff and sell it at their retail store and by mail. It comes as a powder that you mix with water before brushing on. A 1 pound bag costs $39 the last time I checked, which seems expensive until you mix it up and see how far it goes. It’s enough paint for two or three large pieces of furniture. Besides looking great initially, a distressed milk paint finish only becomes better with authentic dents and wear. How many other furniture finishes actually improve as they get bumped around?
Be sure to watch the milk paint video above if you haven’t seen it yet. It shows why milk paint is one of the best options for creating a distressed look on furniture and woodwork.